[NestJS] Guard와 Decorator로 Oauth 로그인 구현하기
소위 '소셜로그인'이라 부르는 타사 플랫폼의 개인정보를 이용해 서비스에 로그인할 수 있게 하는 걸 구현하기 위해선
Oauth 2.0 표준에 맞게 백엔드를 구현해야 한다.
Oauth 의 구성요소
Oauth 인증의 구성요소, 즉 역할은 4가지가 있다.
- Client: 리소스를 요청하는 주체
- '리소스'는 단순 유저의 개인 정보뿐만이 아니라 구글 캘린더, 네이버 블로그 포스트 등 다양한 정보가 될 수 있음
- Resource Owner: 리소스에 대한 접근을 제어하고 권한을 부여하는 주체.
- e.g.) Google, Naver와 같은 플랫폼
- Authorization Server:
Access Token을 발급해주는 서버 - Resource Server:
Access Token을 가진 요청을 검사하여 리소스를 반환하는 서버
Oauth 플로우
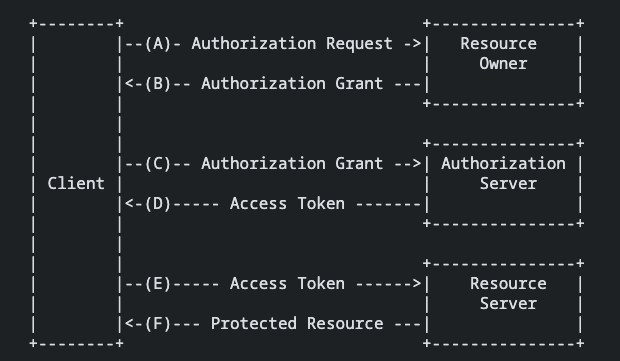
간략히 정리하면 이러하다.
1. Client가 Access Token을 발급받기 위한 인가(Authorization)을 요청한다.
2. 1에서 받은 인가를 통해 리소스를 발급받기 위한 Access Token을 요청한다.
3. Access Token을 통해 리소스를 요청한다.
하지만 아무 Client나 인가나 리소스를 요청할 수 있는 건 아니고, 어떤 Client가 인가와 리소스를 요청할 것인지Authoriation Server에 등록해둬야 한다.
즉, 구글이나 네이버의 소셜로그인을 구현하고자 하는 경우, 해당 제공자들의 Oauth 콘솔 같은 데 들어가서 Client를 등록하고 그 Client임을 식별할 Credentials(client id, secret)를 취득해 둬야 한다.
그리고 이 Client가 접근할 수 있는 리소스의 종류와 범위(scope, e.g. 이메일은 필수 동의, 성별은 이용자 선택 제공 등)를 정해준다.
이 때, 웹 페이지에서 인가를 얻고자 하는 경우, 정상적인 endpoint에서 요청을 보내는지 검사하기 위해 redirection URI 라는 것을 별도로 등록해야 한다. redirection URI를 등록해두고 해당 Client가 추후 올바른 Credential과 redirection URI를 가지고 인가를 요청한 경우, Authorization Server가 해당 redirection URI 뒤에 쿼리스트링으로 인가 코드를 포함시켜서 리턴해준다.
그렇게 얻은 인가 코드를 가지고 Credential(client id, client secret)과 redirection URI과 함께 다시 Authorization Server에 보내어 Access Token을 요청한다. 그러면 Authorization Server가 Credential을 검사하고 해당 인가코드와 그 인가코드가 발급된 uri와 redirection URI가 일치하는지 확인한 후에 Access Token을 발급해 준다.
(리소스 제공자에 따라 추가 프로퍼티가 필요할 수 있다)
그리고 나서 발급받은 Access Token을 가지고 리소스를 요청하면 지정해놓은 scope에 해당하는 리소스들을 Resource Server가 반환하는 식이다.
구글, 네이버, 카카오 통합하기
소셜로그인은 딱 3개 구현해 봤다. 구글, 네이버, 카카오.
이전에는 각 제공자별로 Guard를 따로 구현해 줬는데 잘 생각해보니 셋 다 Access Token과 user profile을 조회하는 url만 좀 다를 뿐이지 쿼리스트링으로 포함시켜줘야 할 프로퍼티는 똑같았다.
(네이버의 경우 state 라는 프로퍼티가 추가로 필요하긴 하다)
// google
토큰 발급 url: 'https://oauth2.googleapis.com/token',
프로필 조회 url: 'https://www.googleapis.com/oauth2/v3/userinfo',

// kakao
토큰 발급 url: 'https://kauth.kakao.com/oauth/token',
프로필 조회 url: 'https://kapi.kakao.com/v2/user/me',

// naver
토큰 발급 url: 'https://nid.naver.com/oauth2.0/token',
프로필 조회 url: 'https://openapi.naver.com/v1/nid/me',
그래서 이 세 개를 하나의 Guard로 통합해서 구현할 수 있을 것 같다는 생각이 들었다.
일단 하드코딩을 피하기 위해 제공자 타입을 enum으로 만들고 위의 url들을 일반 전역변수로 저장해 뒀다.
export enum LoginProvider {
  GOOGLE = 'google',
  KAKAO = 'kakao',
  NAVER = 'naver',
}

export const SocialLogin = {
  google: {
    tokenUrl: 'https://oauth2.googleapis.com/token',
    infoUrl: 'https://www.googleapis.com/oauth2/v3/userinfo',
  },
  kakao: {
    tokenUrl: 'https://kauth.kakao.com/oauth/token',
    infoUrl: 'https://kapi.kakao.com/v2/user/me',
  },
  naver: {
    tokenUrl: 'https://nid.naver.com/oauth2.0/token',
    infoUrl: 'https://openapi.naver.com/v1/nid/me',
  },
};
OauthGuard 구현
인가코드는 프론트 쪽에서 받아서 백엔드로 넘겨주고 있다고 가정하고 Guard에서 Access Token을 받아 바로 프로필 데이터를 요청하는 것까지 구현해 둘 것이다.
Guard 하나로 구글, 네이버, 카카오를 다 커버하려면 Guard에 어떤 제공자에게 요청할건지 메타데이터를 넘겨줘야 한다.
로그인을 처리하는 라우트에 @SetMetadata 로 간단히 정보를 넘겨주면 될 것 같았다.
@UseGuards(OAuthGuard)
@SetMetadata('provider', LoginProvider.GOOGLE)
@Post('login/google')
async googleLogin(...) {}

@UseGuards(OAuthGuard)
@SetMetadata('provider', LoginProvider.NAVER)
@Post('login/naver')
async naverLogin(...) {}

@UseGuards(OAuthGuard)
@SetMetadata('provider', LoginProvider.KAKAO)
@Post('login/kakao')
async kakaoLogin(...) {}
이제 OauthGuard를 구현해보겠다. 우선 간단히 Guard의 뼈대를 정의해준다.
@Injectable()
export class OAuthGuard implements CanActivate {
  private logger = new Logger(OAuthGuard.name);
  private loginTokenUrl: string;
  private loginInfoUrl: string;

  constructor(
    private reflector: Reflector,
    private config: ConfigService,
  ) {}
}
라우트에 정의한 메타데이터 값을 읽기 위해 Reflector를 생성자에 주입해준다. ConfigService는 환경변수에서 Credentials를 읽어오기 위해 주입했다.
이제 canActivate를 구현해준다.
async canActivate(context: ExecutionContext) {
    const req = context.switchToHttp().getRequest();
    const provider = this.reflector.get('provider', context.getHandler());
    this.loginTokenUrl = SocialLogin[provider].tokenUrl;
    this.loginInfoUrl = SocialLogin[provider].infoUrl;

    const { code } = req.body;

    const client_id = this.config.get(`${provider}.clientId`);
    const client_secret = this.config.get(`${provider}.clientSecret`);
    const redirect_uri = this.config.get(`${provider}.redirectUri`);
}
라우트에 정의한 메타데이터 값을 Reflector를 이용해서 읽어온다.
그렇게 읽은 리소스 제공자를 가지고 Access Token을 요청할 url과 프로필을 요청할 url을 미리 얻어뒀다.
프론트 쪽에서 보내온 code(인가 코드)를 꺼내고 Client Credentials를 환경변수로부터 읽어온다.
Access Token을 요청하는 함수는 canActivate 밖으로 빼내어 구현했다. (url의 state는 네이버 로그인 때문에 고정해뒀다)
async getAccessToken(
    code: string,
    clientId: string,
    clientSecret: string,
    redirectUri: string,
): Promise<string> {
    const url = `${this.loginTokenUrl}?code=${code}&client_id=${clientId}&client_secret=${clientSecret}&redirect_uri=${redirectUri}&grant_type=authorization_code&state=RANDOM`;

    try {
      const result = await axios.post(url);
      return result.data.access_token;
    } catch (error) {
      console.error('get access token::', error);
      throw new InternalServerErrorException(error.message);
    }
}
Access Token을 가지고 user profile을 요청하는 함수도 구현해준다.
 async retrieveProfile(
    accessToken: string,
    provider: string,
): Promise<IGoogleUser | IKakaoUser | INaverUser> {
    try {
      const result = await axios.get(this.loginInfoUrl, {
        headers: {
          'Content-Type': 'application/x-www-form-urlencoded',
          Authorization: `Bearer ${accessToken}`,
        },
      });

      if (provider === LoginProvider.GOOGLE) return result.data;
      else if (provider === LoginProvider.NAVER) return result.data.response;
      else if (provider === LoginProvider.KAKAO)
        return result.data.kakao_account;
      else throw new InternalServerErrorException('undefined login provider');
    } catch (error) {
      console.error('get userinfo error::', error);
      throw new InternalServerErrorException(error.message);
    }
}
프로필 데이터는 타입으로 써먹어야 되서 interface로 따로 만들어줬다.
export interface IGoogleUser {
  id: string;
  email: string;
  verified_email: boolean;
  picture?: string;
  hd?: string;
  name: string;
  given_name?: string;
  family_name?: string;
}

export interface INaverUser {
  id: string;
  name: string;
  nickname?: string;
  gender?: string;
  email: string;
}

export interface IKakaoUser {
  has_email?: boolean;
  email_needs_agreement?: boolean;
  is_email_valid?: boolean;
  is_email_verified?: boolean;
  email: string;
  name: string;
}
위에서 만든 함수들을 canActivate에서 호출시켜주면 Guard 구현은 끝난다.
async canActivate(context: ExecutionContext) {
    ...
    const accessToken = await this.getAccessToken(
      code,
      client_id,
      client_secret,
      redirect_uri,
    );

    const user = await this.retrieveProfile(accessToken, provider);
    req.user = user;

    return true;
}
@OauthUser 구현
Guard에서 프로필 데이터를 'user'라는 프로퍼티에 추가했으니 이걸 읽어서 Controller 라우트에서 바로 써먹을 수 있게끔
decorator를 만들어줬다.
export const OauthUser = createParamDecorator(
  (
    data: unknown,
    ctx: ExecutionContext,
  ): IGoogleUser | IKakaoUser | INaverUser => {
    const request = ctx.switchToHttp().getRequest();
    return request.user;
  },
);
위에서 구현한 decorator를 Controller에서 써주면 된다.
@UseGuards(OAuthGuard)
@SetMetadata('provider', LoginProvider.GOOGLE)
@Post('login/google')
async googleLogin(
  @Body() payload: OauthLoginDto,
  @OauthUser() user: IGoogleUser,
) {
  return await this.authUserService.oauthLogin(payload, user);
}